SATURATION AND VIBRANCE – WHAT IS THE DIFFERENCE?
 The well-known Saturation and Vibrance sliders in post-processing programs are used by photographers of all genres. But do you know the difference between them and the effect that can be obtained from increasing or decreasing saturation or juiciness?
If not, believe me, you are not alone. In fact, most of us simply “play” with them until they find a combination that makes the image look more or less good. However, for a more efficient and professional workflow, of course, it is strongly recommended to spend two minutes to understand the differences between these settings.
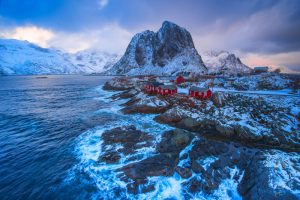
To make things visual and easy to understand, we will adjust the Vibrance and Saturation of the image below. The image was not processed in any other way, and the only corrections made are an increase in the above settings.
Perhaps one of the most talked about tools in all photo editors, Saturation adjusts the colors in the image. They become brighter and deeper when dragging the slider to the right, and when dragging it to the left, the intensity of the colors decreases, eventually a monochrome image is obtained.
Saturation slider adjusts all image pixels. This means that pixels with high saturation are treated the same way as pixels with low saturation. The problem is that by increasing the saturation (dragging the slider to the right), you end up losing some of the detail in the end.
For the example above, the Saturation value has been increased to +65. Notice that now bright colors (see source file below) are starting to lose detail.
In the image below, saturation has been increased to +100. Obviously, the snapshot began to look rather ridiculous, but notice that now there are colors that were not visible in the source file.
Saturation and Vibrance – what is the difference
For this example, the Saturation value has been increased to +100
The main difference between the Saturation and Vibrance tools is that the latter does not process all the pixels equally. Vibrance adjusts only the least saturated colors in an image. Colors and pixels that are already saturated are corrected less, which means that they will not be distorted.
By comparing the image below (Vibrance +65) with the image with the same value on the Saturation slider, you can see that it is less surreal and more limited. This shows how Vibrance is a more manageable tool compared to Saturation.
And again, compared to Saturation, the image below shows the same picture with Vibrance when the slider is at the far right.
As you can see, already saturated colors (for example, red) were not greatly changed. The Vibrance slider basically increased the brightness and deepened the color of the less saturated colors in the image.
Use the sliders carefully
The Vibrance slider largely solves some problems with the Saturation slider. You don’t need to worry about colors going bad and you’re less likely to get extremely unnatural looking images. Just do not move the sliders to the maximum, use them carefully and wisely.