
HOW SMALL AND BIG PLANETS ARE CREATED
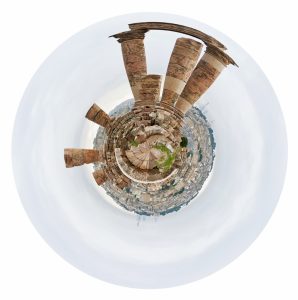 Panoramic photography can achieve a viewing angle of 360 degrees. Such an image is difficult to print and see entirely because of its “contrasting” aspect ratio. One way to show the whole picture at once is to turn the panorama into a small planet. This will create an unusual and interesting image that will look like a real little planet, taken from above with a fisheye lens.
The technical term for such a snapshot is a stereographic projection, although if you go to Google you will see more math than just a picture of a tiny planet. Creating a snapshot requires a panorama with a viewing angle of exactly 360 degrees and distorts it in such a way that it turns into a circle that fits perfectly into a square image.
The first step in creating a tiny planet is to photograph a 360-degree panorama. Since the horizon forms into a circle, nothing but 360 degrees will make your future planet solid. If you stuck images with software that works with 360-degree panoramas, the edges must match exactly if the horizon is at the same level. Although it is better to collect panoramas from the horizon at the same level, modern panorama software can often even out everything for you.
If you used the Sweep Panorama (Sony) or Motion Panorama (Fuji) function built into the camera, you can shoot more than 360 degrees. In this case, it is important to trim the opposite sides of the panorama so that they exactly match. Be sure to do this after alignment, because it affects the edges.
Already with the finished panorama will take just a few minutes to create a tiny planet in Photoshop. The first step is to open the panorama and turn it into a square. This is done in the dialog box Image -> Image Size. Start by unchecking Constrain Proportion. Then make the width in pixels equal to the height or one pixel larger. Thus, if your image was 20636×6515, you can resize it to 6515×6515 or 6516x 6515
If you added an extra pixel, the outer part of the planet can be filled with the color of your choice. Otherwise, the pixels on the edge of the planet will scatter. To add color, use the Image -> Canvas Size dialog box.
Change units to pixels.
Add one to the number of pixels in height.
Click on any field in the bottom row of the reference grid.
Select the color of the Canvas extension.
Click OK.
Then you need to turn the image upside down. This is done through the menu item Image -> Image Rotation -> 180. Skipping this step will create a tunnel, not a planet.
The next step will actually create a planet: Filter -> Distort -> Polar Coordinates. Just make sure that the Rectangular To Polar option is checked, and click OK.
Here it is! Now you have your own miniature planet. Although this guide ends here, the planet can be improved further. While you are in Photoshop, you can be more creative and replace the sky with another one, for example. What is nice is that the image of a tiny planet has a square shape and is much easier to print than a traditional panorama.
