

PRIORITY OF THE EXTRACT AND PRIORITY OF THE DIAPHRAGM: HOW TO LEARN THEIR USE OF THEIR RIGHT
 Semi-automatic priority modes shutter speed and aperture you will find in each DSLR. They allow the photographer to manually set the ISO and shutter speed, or the ISO and aperture size, and then the camera will automatically calculate the missing part of the exposure setting. Consider which mode and when to use, how to work with them, and in what cases you should still choose a manual shooting mode.
Shutter speed priority
In the “Priority shutter speed” mode, you set the shutter speed and ISO you want to work with. Then the built-in exposure meter sets the aperture value in accordance with the specified parameters so that the images are correctly exposed.
A classic example of using shutter priority is panning.
Panasonic Lumix DMC-LX3, 1/15 s, f / 8, ISO 100, focal length 5.1 mm (EQ 35:24 mm)
Panoramic photography is a classic example of using exposure priority and this panoramic photo demonstrates this. With this technique, when you set a long exposure and follow the camera behind the subject, you can blur the background and show a quick movement. You can, for example, take advantage of the priority priority mode for freezing fast moving objects. Just set a fairly short shutter speed.
And you can do the opposite – set a long shutter speed. You will get images with expressively blurred water in motion or clouds floating across the sky.
If in the first case the photographer works with a time of the order of hundredths or even thousandths of a second, in the second case a time of a few seconds or a few tens of seconds is set. You can also use long exposures to blur moving objects outside the main scene. For example, when photographing attractions such a reception makes it easy to get rid of moving tourists.
When using a very short time, you will encounter the technical limitations of your camera or, more precisely, the lens.
Photo of a drop falling on the surface of the water. The goal was to freeze the movement of the drop using a short soak time. Although the minimum f-stop was used, the photo is still underexposed due to lack of light. Canon EOS 80D, Sigma 18-35 mm 1: 1.8 Art, 1/4000 s, f / 1.8, ISO 100, focal length 35 mm (EQ 35:56 mm)
When shooting exposures lasting only in thousandths of a second, there is often not enough light, even when the aperture is wide open. Thus, there is a risk that the photos will be underexposed, so you need to work with high ISO values, which will reduce the technical quality of the images, because they will have more noise.
This can be compensated by shooting in RAW format, which saves maximum information about the image. Then you can easily improve the exposure of the photo frame in the program photo editor.
Photo of a drop falling on the surface of the water. The goal was to freeze the movement of the drop using a short soak time. Here, in order to cope with the lack of light, automatic ISO mode was turned on. In this way, the camera can decide which ISO is best for achieving the right exposure. However, this photograph is underexposed due to an imperfect measurement by the built-in exposure meter. Canon EOS 80D, Sigma 18-35 mm 1: 1.8 Art, 1/4000 s, f / 1.8, ISO 800, focal length 35 mm (EQ 35:56 mm)
On the other hand, when shooting with an extremely long exposure time (tens of seconds), even a fully closed aperture cannot sufficiently limit the light reaching the sensor. You must help yourself through a neutral density filter (ND) or a polarizing filter.
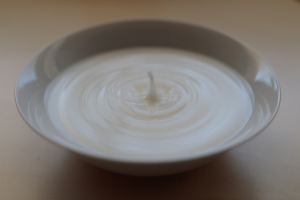
Photo of a drop falling on the surface of the water. The goal was to completely blur this blob on the image. For this, the maximum shutter speed was set. Thus, the camera closed the diaphragm as tightly as possible. Even with such a high f-stop and a minimum ISO setting, the set exposure time is still short and the drop is visible. Canon EOS 80D, Sigma 18-35 mm 1: 1.8 Art, 1/5 s, f / 16, ISO 100, focal length 35 mm (EQ 35:56 mm)
Photo of a drop falling on the surface of the water. The goal was to completely blur this blob on the image. Taking into account the fact that the built-in exposure meter has a tendency to underexpose bright photos, an exposure compensation of +1 and 2/3 EV has been set. This allowed to set the time of 0.6 s, and it is so long that you really do not see a drop, only a trace of it is visible.